
Disclaimer: All actions performed here were performed in an enclosed safe environment by professionals with 10+ years in automotive pentesting experience. Attempting any of this yourself will likely cause irreparable hardware damage. Don’t try any of this. Anyway, just enjoy the show.
Most reading this are probably aware of the relatively cool looking screen seen in almost every single modern Cadillac. On this specific Lyriq EV below it is a 33 inch (diagonally) ‘9K’ screen. It behaves as a seemingly singular FALD (Full Array Local Dimming) high resolution panel, and it does look gorgeous even I’ll admit that. It may not be the most functional thing, but I respect it.

Anyway, it would be cool to use this screen for other purposes (desktop monitor, wall art, etc..). But what would be even more cool is if I reused this screen while reusing the original Factory Radio.
…
But snipesy! It’s all locked down!
…
Yes, well sort of. Not really. Depends on your point of view. More on that later… It just adds to the challenge. I really want to use the original factory radio for a few reasons.
- It’s cool as hell, an epic story, and a world first.
-
It reveals the anti right to repair measures put in place by OEMs (for frankly no really great reason). Many of the measures put in place don’t add much security, but simply make it harder for third party interoperability and repair.
-
It’s a challenge. It’s been far too long since I proper challenged myself.
-
Perhaps this can be used to inspire others to do their own (responsible) tinkering. There just isn’t enough disclosure or documentation when it comes to automotive pentesting, or just aftermarket parts development in general.
-
I personally don’t believe automotive software is near as secure as it is implied by OEMs in large part due to a lack of independent research. This is particularly important as most OEMs abandons their software after like 3 years of it being released. There are tens of millions of vehicles on the road today which are at risk.
Acquiring the Parts
Believe it or not acquiring the screen at a reasonable price was the hardest part of this project. It is around $1000 new before dealer mark up, and so I bought it used. The problem is the screen is fragile and most used automotive part shops are not exactly experienced with dealing with such fragile devices.

3 Screens arrived broken. All went back. That was until I spotted this guy. A 2025 CT5-V with 3 miles on it at Spalding auto parts in Spokane, Washington.

The screen arrived in nearly pristine condition with even the factory tape over it. I was so paranoid I put foam over it. Putting foam at the front bottom edge of the screen significantly helps its stability.

I was concerned the screen would have parts pairing in it which would prevent it from working with other radios, but I am happy to report it works fine on any radio that has a similar screen. I.e. a 2025 Lyriq screen works on a 2025 CT5-V, and vice versa (although the actual plastic mounting locations may differ).
The second hardest part of this project was the harness. While a harness is not strictly required, it does make life significantly easier. Rather than use the harness as a whole I instead opted to cut the harness open and take the individual wires I need to save space. This is also done to be able to remove several high speed data cables which cannot be reliably spliced (i.e. the display cable from the Radio -> Screen).

Partially stripped instrument panel wiring harness
I don’t really have any ‘part numbers’ to give. Most of the parts were bought by eye. The screen is from a CT5, and we have 5 radios from various Cadillac Lyriqs, a Chevy Colorado, and a Cadillac CT5. Each with different software depending on when the vehicle hit the bed. And they all work with the CT5 screen (except the colorado one is a bit temperamental). The part numbers vary randomly for reasons we aren’t told (probably different MFG runs, so take any part number with a grain of salt).
Dissecting the Radio
This where the fun begins
Variants

2025 CT5-V Radio w/ FAN and extra daughter board
There are several variations of the radio as evident by the numerous FCC Listings. But, they are all extremely similar to one another. We opted to open the 2025 Lyriq unit as it lacks the extra antenna module and is slightly easier to disassemble.
For example some will have the HUD slot not connected (and associated internal ICs missing). Some will have the extra tuner hardware on top missing, and there have likely been internal mods to each radio over the years.

General Motors also utilizes a legacy Intel based chip which is primarily used in lower trims of the Chevy Silverado/Sierra.
I did not acquire any of these, and have no idea what differences it has. This series is focusing on the qualcomm. Since Intel discontinued their automotive line going forward all radios will use the qualcomm chipset, or eventually move to other future archs.
Lay of the Land Overview
The radio has 2 primary CPUs as shown in the architecture below (note this architecture is simplified to only show what were concerned about for now, in reality there is extra systems like the audio bus, various tuners, wifi controller, etc…)
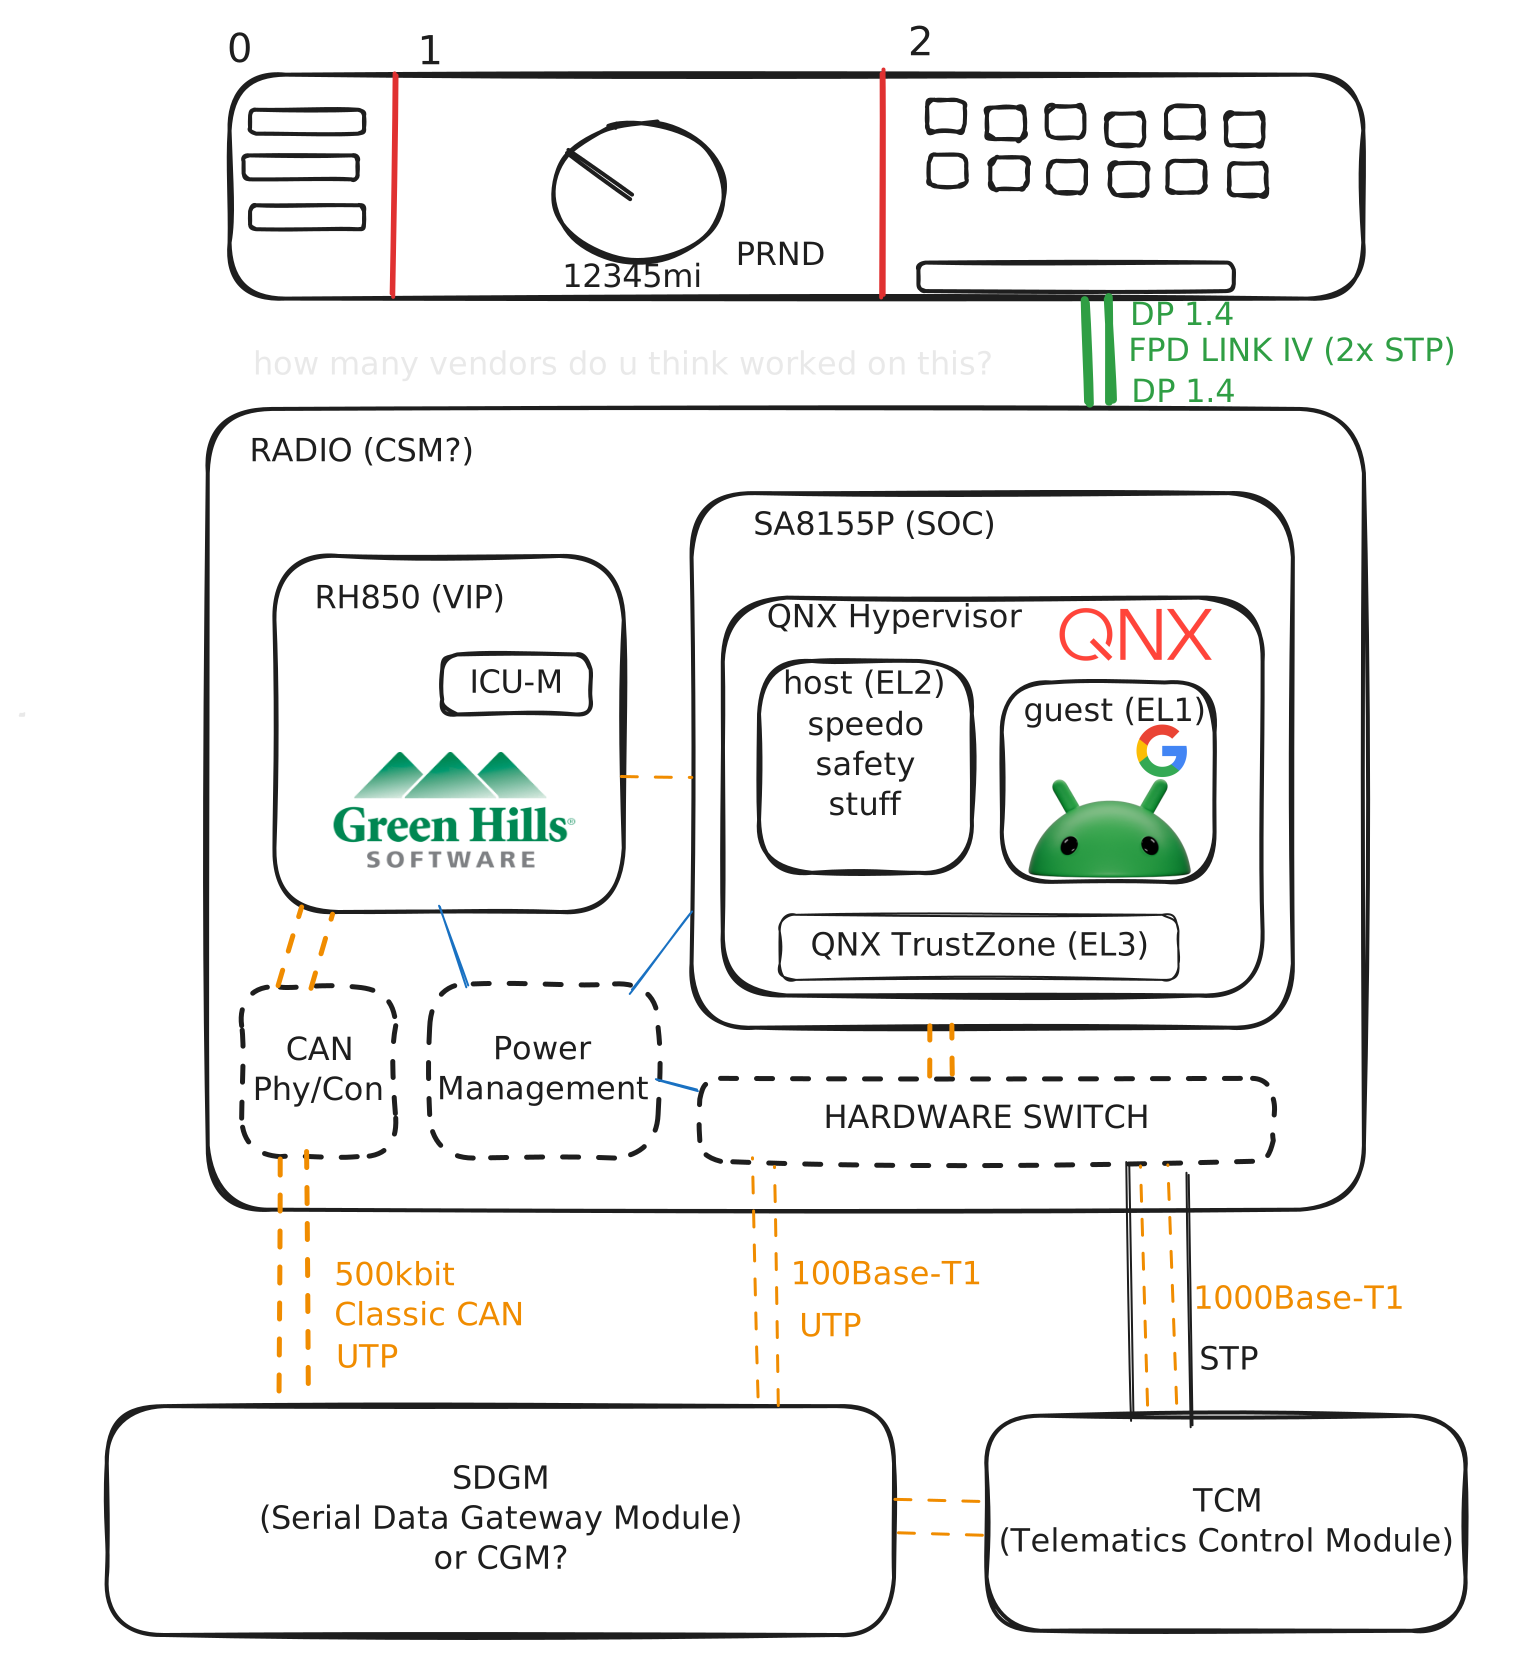
- The RH850 otherwise known as the “VIP” for some reason, is an RH850 (a common embedded automotive MCU). It is primarily responsible for power management, system reset watchdogs, and CAN comms (which includes most vehicles states and SDGM handshakes). In low power mode even the RH850 powers itself down and instead waits for a wait signal directly from its CAN phy. This allows the entire radio to consume sub milliamp power when sleeping (it is powered by 12V battery 24/7).
-
The “SOC” is a Qualcomm Snapdragon SA8155P. It is orders of magnitude faster than the RH850, supports displayport, and is extremely similar to a processor found in an Android Smartphone (just with more pins, pcie, etc…). This should obviously make sense considering the SOC runs Android.
-
The QNX Hypervisor is a mini hypervisor system used for safety critical systems. Read more about the various terms here.
-
The “host” lives within the QNX hypervisor, and uses traditional QNX software. It draws the speedometer, controls your cameras, lights, and other more safety critical functions.
-
The “guest” is booted by the host, but also lives within the hypervisor at a slightly less privileged state. It runs a variant of Android known as Android Automotive Operating System (we call it AAOS). Note that AAOS != Android Auto (confusing right?). In GM’s case, they are partnered with Google to provide Google Automotive Services (GAS). So this variant is commonly called AAOS w/ GAS. This is in contrast to other OEMs like Rivian who simply utilize AAOS directly (without Google Services).
-
The switch is used for the various automotive ethernet channels to the radio. It functions just like any other networking switch just with automotive ethernet.
-
The display is simply DP 1.4, but the DP1.4 is first converted to FPD Link IV over 2 twisted pairs and then converted back to DP1.4 by the screen before its consumed like any other PC monitor. FPD Link IV also has an I2C side channel used for brightness control, and touch.
-
The SDGM ties all the networks in the vehicle together, and it is also what most modules handshake against to detect theft. Read more about this system in The ABCs of Global B.
-
The telematics module provides an internet connection to the radio and other supporting controls, but nothing that’s critical to the function of the radio. I.e. the wifi is actually done internally on a trace (at least for this unit).
Those of you with keen eyes will see that in the Cadillac example the screen is really just 2 screens in a trench coat, and this is correct. This same system is used across most of the GM Lineup, and so the difference between the Cadillac screen and a Chevy Equinox is simply a matter of running 2 cables to 2 screens, versus consolidating it into one. This is also why many connectors on the actual main board have 12 or even 14 pins, while many times only half are used.
Cracking it Open
The board notably has no silk screen.

We cleaned the thermal compound off for better pictures.

Cleaned board (top view)

Ethernet Switch

SA8155P Module: Main SOC, 2x 6GB Micron LPDDR4X (top left bottom left), 2x power management ics (right)

RH850/F1x variant (center)

128GB UFS Module (NAND memory)

Molex High Speed Autolink II (HSAL2) 12 pin gray (left) 14pin black (right)

Aptiv AMEC 050

Molex stAK50h
Initial Adventures
Before going deeper in the project we initially just had the radio and a dream. No screen, no data. Just a headless brick. With wires stuck into the radio because we didn’t have a harness.
Power!
The first thing we did was give the board power. It got hot so we put some heat sinks on it. This did power on the board but it would simply turn off after like a minute.

The Factory must grow in complexity
It was clear that power and CAN alone was going nowhere so we upped our efforts. We upgraded to a PCAN FD-PRO and began hooking into the automotive ethernet connectors. We got a lot of interesting data from the radio at this point but nothing too cool. However, we now knew where the CAN headers were, USB, power, Ethernet, and other data which would be essential later on. While my skills at soldering are not great, we destroyed a radio to get a full UFS read around this time as well which helped drive analysis further.

The Debug Header
While the board edge fingers is very obviously for debugging (JTAG, clock sync, UART, etc…) in practice it was locked down and mostly disabled. It was worth looking anyway. There’s probably something here we missed, but without silkscreens its difficult to tell.

It was very obvious at this point we needed to sniff a car. So that’s what we did.
Sniffing a Car
To make the radio happy we decided the best method would be to replay data from a real car.
So, we built a harness that could isolate the radio and simply log all traffic on all busses (ethernet, CAN, all of it). A unifi US8 was repurposed to allow seamless packet capture (pcap). All of this was temporary and 100% reversible, and the car was none the wiser.

Party in the front

Business in the back
Here’s an excerpt CAN log.
can0 0E1#0000000000000000 R
can0 088#7EF8CFF200000000 R
can0 586#2490C0000300E160 R
can0 5D6#0B0011124914B7F0 R
can0 5D7#0026004D06892980 R
can0 702#00000800CA000CA0 R
can0 703#0000000000000000 R
can0 704#0000000000000000 R
can0 4F5#0000000000080780 R
can0 753#000000000003FFFF R
can0 4A6#8360D56FFFC06001 R
can0 03F#00101100000D00 R
can0 045#000000000000 R
can0 055#0000000000000000 R
can0 3AB#FECFFE6400000000 R
can0 754#01C3060F000060C1 R
can0 4A5#C18306001E3060C3 R
can0 755#0000000000000060 R
can0 756#000000242C242C00 R
With this we discovered a lot i.e. the VIN was broadcasted on 0x712, 0x75F, and 0x49B. And we now had a system to replay to the bench unit.
Of note: Some of these messages do have a MAC (the ones with random data). These are for things like power steering, but they aren’t actually essential to the radio. Those modules aren’t even on this BUS.
Booting the Radio for the First Time
We were now serious. We acquired the screen, made our harness, and assembled a bench unit.
At first we just fuzzed it (for the lulz) which interestingly does work, and it gives you some… Interesting fault error messages.

But eventually we fine tuned the process, the radio was happy… And, It booted.
Why does it boot? Well it turns out the only thing the radio actually cares about is the VIN. Provide it the correct VIN, and it boots with only some errors. There is no security on the VIN so you can simply make it whatever you want. You can even ask the radio itself (over normal UDS diagnostic CAN) what its VIN is, and then immediately broadcast that VIN.
If you do get it wrong then the SOC still boots, but the Android portion will show a somewhat permanent activity saying “Theft Locked”, but even this can be worked around and the android unit then works as normal even if the VIN doesn’t match.

Theft Locked Radio, sry for fingerprints
This lack of security is probably by design as the radio must display safety critical data even in failures (i.e. the vehicle speed, air bag lights, and other safety warnings).
The Next Steps
The next steps are to replace the running software with our own. This isn’t exactly easy though, like on many modern smartphones you could say the ‘bootloader’ is locked. From the factory efuses are burned, and so trying to overwrite any images will just partially brick it (we tried anyway because anything is possible).
And yet…
Stay tuned for part 2!
Accreditation
This is the largest Reverse Engineering project we’ve taken on yet, and the research extends beyond just one person.
Jessie Hoogestraat
Stephanie Howanietz
Kevin Pham @ Deoxy
Disclaimer
Posts in this category are my/our personal commentary and independent research. They are not official Surreal Development guidance, and they do not represent the views of any corporation we affiliate with implied or otherwise.